3.15.2015

Everyday Natural Glam


Today's look is one of my personal favorites to do for an everyday more natural glam that's really simple to achieve. 


 On the eyes all I used were MAC cosmetics 'cork' and 'ricepaper' eyeshadows. Cork is the light brown just blended in the crease, and rice paper is the shimmery white patted into the base of the eyelid as well as barely swiped under the bottom lash line. 

I used Tarte Cosmetics tarteist eyeliner which I am now obsessed with, and focused it more on the top and the wing. Lashes are Ardell Lashes; demi wispies. Used Anastasai Beverly Hills dipbrow in 'blonde' for the brows. And for the lips 👄 it's the sephora lip stain in '14'. I added the smallest amount of MAC cosmetics 'myth' to the center to brighten it a bit and voila! Easy natural glam. 💕 and don't mind my horrible fly aways-- I was being soooo lazy with my hair. 🙈

3.08.2015

Sally Glitter Cut Crease

A little eye collage for your Saturday morning! ☀️ Used MAC cosmetics 'cork' and 'mulch' and Sally beauty glitter. I can't find a name on it. Sorry! Used Nyx Cosmetics jumbo eye pencil in 'milk' as base under glitter. || Anastasia Beverly Hills dipbrow in 'blonde' || House of Lashes in 'noir fairy'. || Tarte Cosmetics tarteist clay paint liner. BH Cosmetics  waterproof eye crayon in 'royalty' smudged on bottom lash line.

2.26.2015

Too Faced Beauty Balm


I wanted to share my absolute favorite BB cream; the Too Faced Tinted Beauty Balm. I used to really love the Garnier BB cream but comparing the two this is the winner hands down. The bottle I have pictured is completely empty and I definitely will be repurchasing another one. This product is that its very versitle. You can use it alone or undermakeup as a moisutizer or primer. It gives a perfect sublte finish. It gives me just enough coverage to not feel like I'm exposing all of my imperfections but is natural enough that you will see my skin underneath. I normally wear this when I am just out and about with my two little men running errands or playing at the park. I have an oilly t-zone and what my FAVORITE thing about this is that it doesn't leave an oily residue whatsoever! That was my biggest issue in finding the perfect BB cream. 

 You can apply this all over your face, add a few swipes of mascara and some chapstick and you are ready to go! Depending on your skin type you may need to add a hint of powder. Sometimes I will add just a very light dusting on myself, but nothing heavy. This has great SPF coverage as well, (SPF 20) so you dont need to worry about the sun while you're out either! 

The color that I use is 'Linen Glow'. This BB cream is $34 for a 1.5 fl oz. If you are worried about the cost, let me just say that a little goes a VERY VERY long way! I had this bottle for at least a good year or so! 


2.04.2015

Josie Maran 100% Pure Argan Oil


This is one of my favorite things I use for my skin. I absolutely LOVE it.

I got this bottle the Christmas before last, and it's still not empty. A little goes a really long way, and it was so worth the money! I tend to have an oily t-zone, and for years I fought it trying to dry my face out as much as I could, but I now know that that only makes it worse! The best solution to cure an oily face is to fight oil WITH oil! Sounds crazy, right?  To be honest, when I first got this, I was so nervous to put it on my face. I was like AHH...OIL....ON. MY. FACE? WHY WOULD I?  Well I did and am SO glad I started using it. Let me tell you that it has nearly changed my skin. I still get oily at times, but nothing like I used to when I was constantly trying to dry it out. Everyone can use and benefit from it. You don't have to be oily, its just a wonderful moisturizer and 100% pure, which I LOVE! 

I use this only at night after I have cleansed my face; that way I can sleep with it on all night. Then I get to wake up and my face feels so completely baby soft! You also can use this on your lips, (which I do especially during these harsh winter months) cuticles, elbows, basically any dry area as well.

Pictured above is the "to go" sized bottle, which is a 0.5 oz / 5ml bottle that retails for $16.00. They have the regular sized bottle, which is 1.7 oz / 50 ml for $48.00. I normally like to get sample sizes or the travel/smaller sizes so that way if I don't love it, I don't feel guilty breaking the bank. There is also a "light" version of this oil, which I haven't tried, but have only heard just as many great things about it, since it's the same thing, just lighter! ;) I may end up giving it a try once this bottle is out, but seriously I love this oil!

4.27.2014

My Blonde Secret.

So I figured that I would let you in on a little secret weapon of mine. I get asked ALL of the time how I keep my blondes looking so blonde, and how I keep my blondes looking so healthy. As any of you fellow blondes will know that having healthy, silky, shiny blonde hair is not an easy task. Bleaching the hair can be very damaging and takes a lot of extra care to make it beautiful. So today I am letting you in on my secret which a lot of people call, "purple shampoo". 

This is my secret weapon to keeping my blonde hair from turning brassy and orange; which can easily happen in between touch ups. 

You can also use this if you have just had your hair lightened by your stylist but maybe it wasn't toned correctly, (although, if this happens you may just need to come see me. ;) ) but if it does happen, you can pull out this bad boy and tone it right up on your own. On the color wheel purple is the opposite of yellow/orange so it is going to help pull those out; to really clean up your blonde strands. 

Also note that you also do not have to be completely blonde to use these products. You can use them if you have a few highlights, ombre, or even some bayalage going on. Anywhere that has been lightened and is need of some attention you can use this. It will not affect dark hair so don't worry about shampooing your whole head even if you have just a few highlights.


These are the two purple shampoos that I personally use. First is the Clairol 'Shimmer Lights'. You can get this at any Sally's for around $8.00. The second shampoo is Matrix 'So Silver', and you will need to get this from a matrix salon, or it is available online at Ulta.com and it runs around $20 for a 33oz bottle. (and no you cannot find  REAL Matrix products at Walmart, Walgreens, etc. Those are imitations. Please do not use them, but that is a post for a whole different day.)

With these shampoos if you want to just brighten up your blondes you will just shampoo as normal, and leave it on for 2-3 minutes. If you are wanting to get some toning accomplished you will leave it on for around 5 minutes. Just watch for your hair, because if you leave it on too long the hair may can rinse out with a purple-ish tint. If that does happen, do not worry, the tint will wash out within one to two additional washes with regular shampoo. So just follow the instructions and you wont have any problems.

The only down fall I have ever had using these products is that it tends to be a tad drying to the hair, so just make sure you use a really good conditioner or even add in a deep condition whenever you use it! 

Honestly I love my purple shampoo, and pretty much can't live without it. I personally use it once a week or whenever I feel like my blondes need a little loving. 

So there you have it. My secret is out! :) I hope you enjoyed this post and were able to learn a little something. 

Let me know what you guys think, if you have tried it, or any questions!

xoxo beauties! 

4.24.2014

Lorac Pro Palette

First off I just have to apologize for taking so long to post about this! I hate to just say that I have been so crazy busy and haven't had the time, but I have to say that because it's the truth! Anyway, I hope you guys are still out there, and wanting to learn more about makeup, and I am sorry for being such a slacker! 

Okay now moving on. :) If you follow me on Facebook or Instagram you will have seen that I have posted quite a few of makeup looks using the Lorac Pro Palette, and you will also know my deep love for this palette. This thing is just  amazing! 

 I had someone ask me, "what is a palette?" A makeup palette is basically just a combination of eye shadows combined into one 'palette'. This makes it extremely easy to work with, because you aren't having to buy a bunch of single shadows to get different looks. You also aren't having to open and store a ton of single eye shadows, which can easily end up in a big giant mess and taking up a lot of storage space.

The reason I love this palette is because it is EXTREMELY versatile. I feel like everyone should have this in their makeup bag. It can easily go from a simple beautiful daytime look, or a deep, sultry evening look. The colors are extremely pigmented. They are super creamy and soft, really easy to blend, long lasting and my favorite part is that you hardly have fallout, (if ever) onto your face. 

The top row of shadows are all a matte shadow, and the bottom shadows all are a more shimmery/glitter shadow. Which is perfect because when you are combining colors you never want your eye shadows to be ALL sparkle or too matte for one single look. This way you can easily combine the two. 


What I also love is that this palette also doesn't have an age range with it. And when I say age range I mean it works for all ages. It can work for anyone from their early adulthood to their more mature years. I recommend this for all of my clients. Especially when they want something that's decently priced, that is long lasting and versatile. You can buy this palette online or in stores at any Ulta or Sephora. (If you want it online just add a .com to either of those places.) The palette is priced at $42. If you order it online at Ulta you get a free gift with your purchase. When ordering online from Sephora they also gives free samples, so either way you are golden. Let me also just remind you, if you see the price of $42 and think,  sheesh that's a lot to spend for some eyshadows, but it really isn't at all when you think about it. You are getting 16 ULTRA pigmented and beautiful shades all for $42....? Sounds like a steal if you ask me. I am sure you all can do the math on that one!

Now, I really don't want to sound like this is a sales pitch because it isn't. I gain nothing from you purchasing this or not purchasing this. I just love sharing a good deal when I find one and I LOOVE this! 

Does anyone out there already have this? If so, tell me what you think! And of course if you have ANY questions please let me know! I would love to answer any that you may have! 


3.31.2014

Nyx Butter Gloss

I got these three NYX butter gloss in my recent nyx haul and this was the first time trying them and let me just tell you that I am in LOVE with them.

Overall Rating: 5/5


 These get such a good rating from me because they are ultra moisturizing, glossy, they smell delicious,and the color pay off is pretty great too. I did notice that with the first two lighter shades I had to apply a few coats to get the color I expected from the bottle, but I didn't mind that too much. With the darker shade I got, it only took one or two coats to get to the true color, so I was impressed.

 They also work well to add on too of another lipstick color to change it up a bit, and I liked that a lot. 

Now back to the moisturizing, which is HUGE for me, anytime of the year, but especially winter. These bad boys made my lips SOOO soft -- far after the gloss had been removed, so I am thrilled! 

And at only $5 a piece, you can afford to get as many colors as you'd like! 

Completely obsessed. 

The colors here are 

1st Maple Blondie, 2nd  Eclair and 3rd Strawberry Parfait.


3.30.2014

Gold Smokey Eye

Here is the tutorial for the makeup look I posted on Instagram and Facebook earlier today. If you have any questions in regards to any of it, feel free to let me know! I love feedback! :)


I started with Smashbox Photo Finish Lid Primer. I just got this the other day, so this was the first look I have used it with, but so far so good. I will do a product review on this product another day.
 If you don't have some kind of eyeshadow primer, I would highly suggest looking into getting some. There are some really great products out there. If you are on a budget, I would try the e.l.f.  eyeshadow primer. it works decent enough, or  I also love to use, NYX Jumbo Eye Pencil in 'Milk', and I believe this is only around five dollars. 

With this look I used only these four colors from the Lorac Pro Palette. I love this palette. It's super versatile and it allows you to create A LOT of looks from one palette. Its definitely worth investing in. The shadows are super creamy and really pigmented! 
Starting with #1, which is the color 'Nude' you will focus most of this color on the inner corner of the eye (tear duct area) and under the brow for a highlight. 

Next take #2, which is 'Gold' and apply to the base of the eyelid.

#3, which is 'Garnet' you will apply this to the crease area, and blend blend blend. 

#4, take the color 'Espresso' and apply it to the outer corner of the eye and blend inward, blending into the other two colors. 


I then took MAC Fluidline Gel and lined above and below the lashes. Then take an angled bush and using the color 'Gold' again blend the liner with the shadow for the gold smokey look under the bottom lashes. 

I used these Ardell Demi Wispies, with a little bit of mascara on my natural lashes to blend them together. 

Blush I used: Too Faced, Papa Don't Peach 


Bronzer: Too Faced Chocolate Soliel. Which is my favorite and you will see me use it all the time.

Lastly Lips: I used Nyx Lipstick in 'Power' which comes off as a really pretty lilac-y purple. I really love Nyx lipsticks, they are super soft, smooth, and moisturizing.


 And to finish my looks off I have been using and LOVING this NYX Illuminator in 'Narcissistic'.  It gives a really pretty dewey, glowing highlight. I add this to the to the side of my cheek bones, bridge of my nose, and above the cupids bow. 


And there you have it!  Let me know what you think about this look! 

xoxo,

shannon

3.15.2014

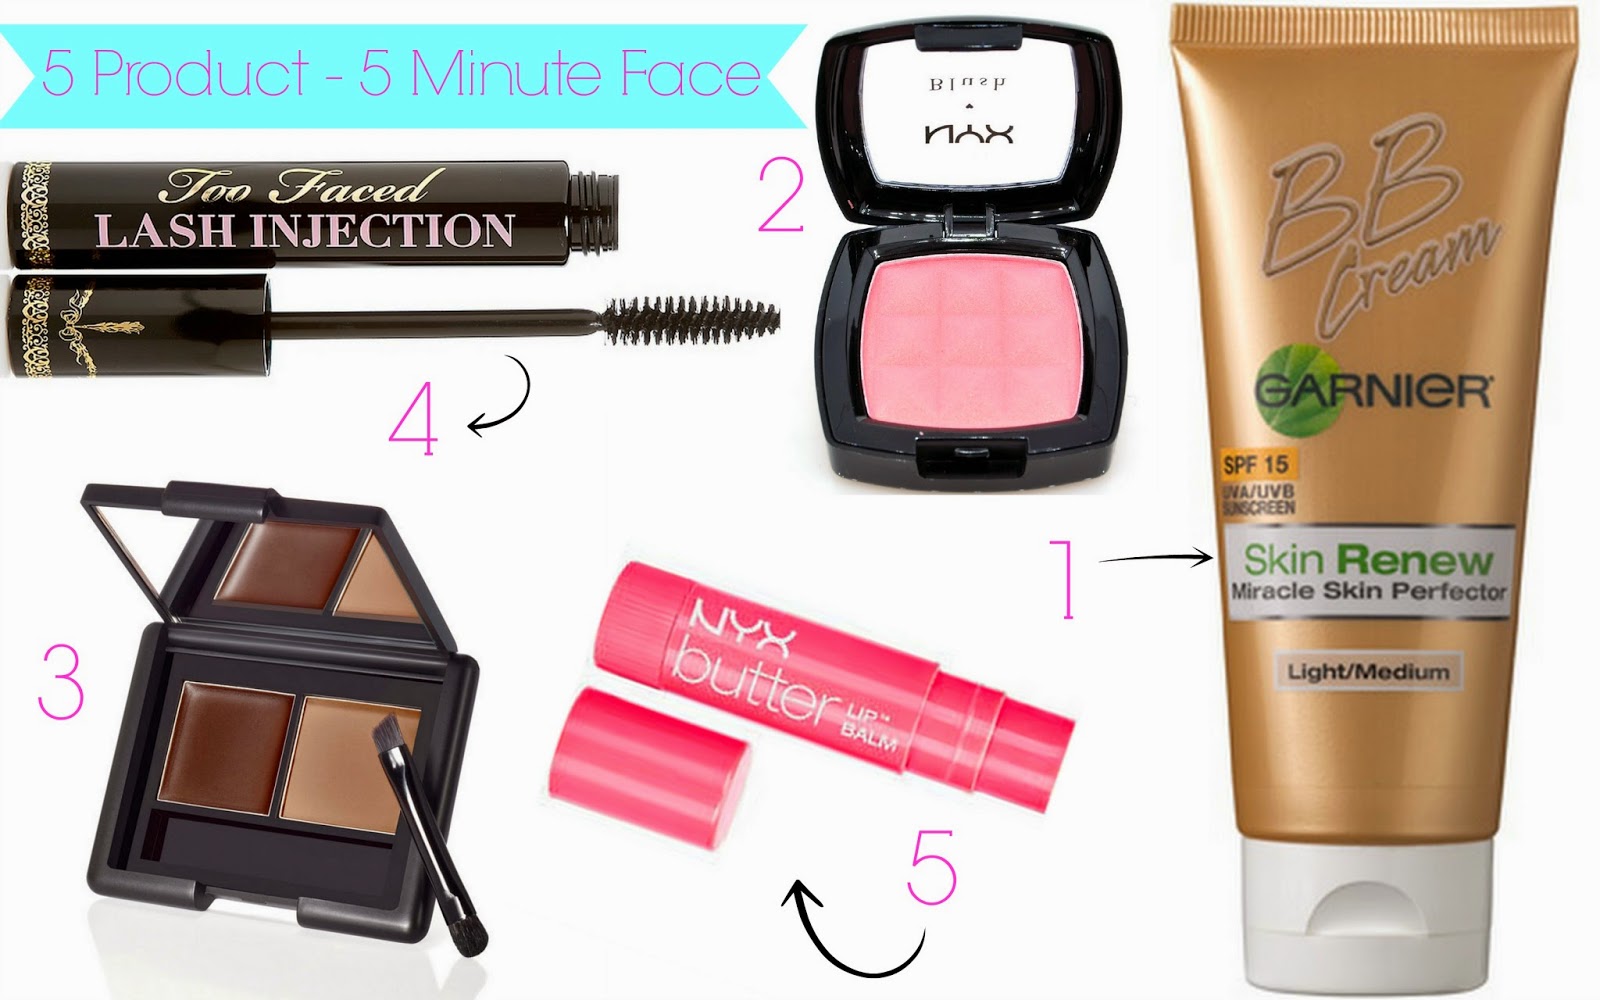
5 Minute-5 Product Face

Being a super busy mom of two crazy boys, I know what its like some days to have NO time to get all glammed up, but that doesn't mean we don't want or shouldn't look presentable, does it? I know we have all been there! Even if you aren't a mom, I know at some point your iPhone alarm somehow didn't go off and you slept in too long, or you have gotten that phone call that you need to be somewhere asap, but you look like you've been living in a cave for the last year. (Or maybe that last part is just me, I don't know), but the point is.... I get it! 

That's why on the days when I have no time to get ready, or the days where I just don't feel like spending a lot of time, these are the five products I use to get ready in five minutes. (Assuming you've already showered, of course.)  But yes you read that right, only FIVE minutes, and I'm not kidding. I timed myself, so I could be sure I wasn't lying to you all. ;) 

So basically all you have to do is slap on these products and you are ready to walk out the door. 


1st: Garnier BB Cream. This stuff is a DREAM. I am telling you. I pretty much can't live without it, especially when I am doing a five minute face. As I am sure most of you know, BB stands for 'Beauty Balm'. It acts like a moisturizer, primer, sunscreen, (which you now know is a MUST, right?) concealer and foundation. It really is all of these amazing functions wrapped up into one nice, neat little bottle. Great right?

2nd: NYX Powder Blush: This is a DEFINITE must when you use the BB cream because the cream works so well in blurring out imperfections, that you NEED to add a little dimension. So I add some blush to the apples of my cheeks to add some life back into my face. The color I used on my face was, 'Summer Peach'. 

3rd. This is E.L.F.'s  Eyebrow Kit, and I actually really love this, especially for it being something like two or three bucks. Now, I have to do some kind of filling in of my eyebrows no matter what or else I just feel like a freak of nature. This product is not only great, but multi-functional because I ended up using the powder on the right as a little bit of eyeshadow so my eyes didn't look so dull, as well as a bit of bronzer on my cheeks. I also used the gel part as an eyeliner for my eyelids, AND filled in my eyebrows with it! BAM! Quadruple threat right there!

4th: Too Faced Lash Injection Mascara. Now you don't have to use this particular mascara, I just used it because I love the stuff. This mascara really is like injecting your eyelashes with falsies. Its amazing, but any mascara will do for the 5 minute face.

5th: Lastly but definitely not least, NYX Butter Lip Balm. This stuff is AMAZING. This lip balm is super moisturizing and has the perfect hint of color added to it. The lip balm comes in 8 different shades, all of which are beautiful but the color I used is 'Macaron'. 

So there you have it! The worlds easiest and fastest makeup look EVER! What do you think? Would this work for you when you are in a rush, or just as an easy makeup look? Let me know! 


xoxo

Shannon


3.13.2014

Follow me on Instagram for my {almost} Daily Makeup Looks


2 Products That Will {REALLY} Help Your THIN hair.

 I met with a Sales Distributor for Sebastian a few months ago and when he told me about the product "Thickefy Foam" he went on and on about how amazing it was, and told me that it makes one strand of hair feel like three strands.


 Now let me tell you that if you don't already know me, I am the BIGGEST skeptic of pretty much everything, but especially big promises like that. I knew immediately who I needed to try it on one of the people I love the most, and one of the people who without TONS of products has the flattest, baby fine hair I know-- my MOM! Bless her heart. :) She has always had to use a lot of product to get any kind of volume in her hair, but when we tried this on her it was seriously like magic! 

It added so much volume and life to her hair. I was amazed. I used this in conjunction with this product, Redken Thickening Lotion. 

The Combo of the two products are what sealed the deal for us. If you decide to use them together, PLEASE be careful with your portion control. Like I always say, start small. You can always add more but you cannot subtract. You don't want your hair to feel weighed down with product. BUT the glorious thing about both of these products, but ESPECIALLY the Sebastian production is that it feels COMPLETELY weightless. And I truly mean that when I say it. 

As a stylist that is my biggest qualm when it comes to using product in my hair and my clients. I HATE HATE HATE when product makes the hair feel weighed down, sticky and or filmy, and I am happy to say that these don't. 

When you use these products you will pump about a nickel to quarter sized amount into your hands (depending on hair length) and work throughout your damp hair. Blow dry with a round brush, putting a lot of focus on the base of the hair near the scalp. And when you are finished you WILL be amazed. I went on and on about my moms hair. I kept pulling it back putting all of it in my hands and couldn't believe how much hair it felt like she had. Needless to say she has been pleased as well.


Here is the before and after picture of my mom. Bless her heart for letting me post this! Love her.

Let me know if you beauties have tried either of these products, and if you haven't yet, if you do in the future! I love comments and feedback so let me know! I hope this helps some of you out there with flat hair. I know it surely helped my mom feel beautiful! 

xoxo

Shannon

3.11.2014

Before/After

Hey Beauties.

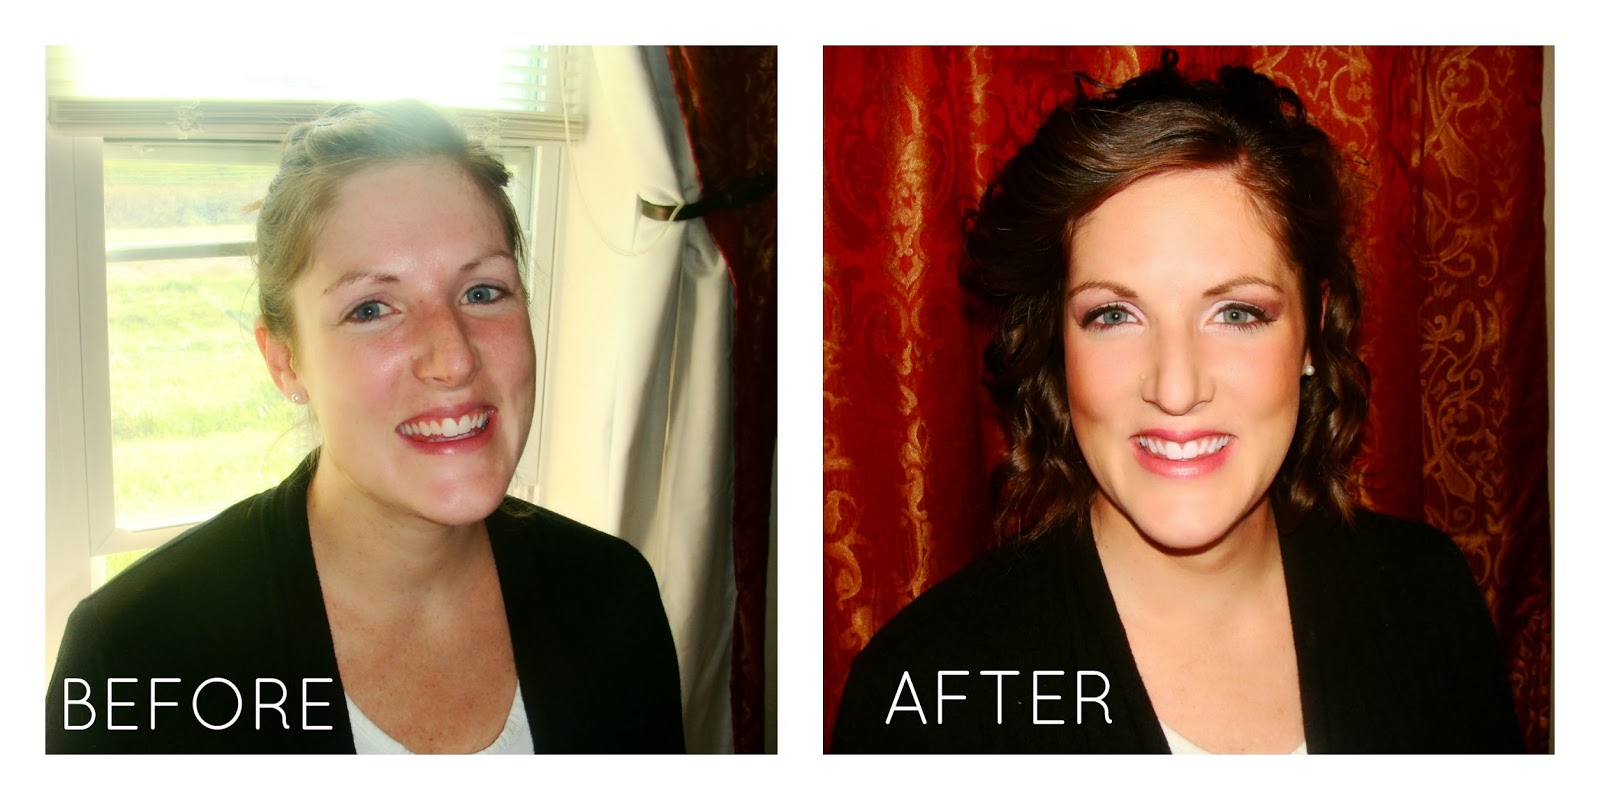
Its super late right now, and I should be in bed, but I just wanted to post a quick 'before and after' of a sweet friend. (who has now moved far far away. {tear}) Kind of like ALL of the law student friends I have made here. Anyway, I wish I would've snapped more photos because I literally had my camera and got one "before" and one "after" picture, so here you have it! We went for a natural, but full coverage look for her flawless face. I only like to cover freckles if they are requested by the client, because like I have said before I love to let peoples natural beauty shine through, and natural beauty =  freckles, but if the client wants them covered then I am happy to make her happy! 


I just love makeup! Isn't it amazing how much more open you make make the eye appear with some mascara and eyeliner! Ahhmazing, right?! 

And I have to apologize, I don't have all of the makeup details for this look, since we did this makeover clear last year in like September or something.

3.10.2014

Did you hear about Bill McElligott?

Did you know that approximately 80-85% of the symptoms of aging is caused by the damaging effects of the sun? When I first learned this I was shocked! I thought that it was obviously genetic and then maybe a little bit of the sun, but I had NO idea it was that much! I want to share with you a story that was on CNN. Some of you may have seen or heard about this, but it's the perfect example of the effects of UVA and UVB rays. 

Now look closely at this mans face. As you can see on the right (his right) he has what looks like normal aging going on, but on the left, you can tell that he has A LOT more wrinkles going on, a lot more sagging in his skin, etc. This man was a truck driver for 28 years, and the left side of his face was constantly exposed to the window, which does not filter out the UVA rays for all your commuters out there, and he admits he never wore sunscreen. In the article it says that he never thought anything about it until his grandchildren would ask him why the sides of his face looked so different. It was then he decided to see a doctor. 


"This man's face is possibly the most compelling argument for wearing sunscreen. Every day, all day, and lots of it.
Truck driver Bill McElligott, 69, has unilateral dermatoheliosis, according to The New England Journal of Medicine. Essentially, ultraviolet A (UVA) rays transmitted through the window of his delivery truck have severely damaged the skin on the left side of his face during the 28 years he has spent driving on the job.
As a result, the left side of McElligott's face looks roughly 20 years older than the right, the Toronto Star reports. The difference between the two sides of his face is so pronounced, even medical experts were shocked."
source found here

This to me is undeniable. People, please wear sunscreen an stay out of the tanning beds! Luckily, these days, most moisturizers and even foundations will have some kind of sunscreen in them, but some may not, so when you are out purchasing new products  please read the labels! Make sure you are being protected.

 Here are a few tips on how to keep your face looking fresh, and how to age as gracefully as possible. 

{Because we don't want to end up having to get plastic surgery and looking like the new species that is going on in Beverly Hills, now do we? } 

Like this 

Source: Google Images


Tip 1: Avoid deliberate exposure to the sun, and when you are exposed get sunscreen that blocks UVA and UVB rays, with a SPF of at least 15. And just so you know the suns UV exposure is at its peak between 10am and 3pm, so cover up!  

Tip 2: Apply sunscreen at least 30 minutes BEFORE sun exposure. Not 30 minutes after being out in the sun. At that point the skin is more likely to be inflamed and irritated by the chemical in the sunscreen when its applied after being exposed. 

Tip 3: DO NOT SMOKE. It's a simple as that. Just don't do it. I think we have all heard that run down of why smoking is bad for you, so I dont need to get into it. 

Tip 4: Try to de-stress when possible. Stress can cause biochemical changes that can lead to tissue damage (aging).

Tip 5: Eat healthy and drink a lot of water! If you aren't eating healthy your body is being deprived of the proteins, carbohydrates, fats, vitamins, and minerals that are necessary to maintain healthy skin. 

Lastly try and follow a good skin care routine. Wash your face daily, and gently exfoliate to remove any dead skin cells and all of the nasty pollutants that your face comes in contact with on a daily basis. 

I hope this has inspired any of you who perhaps may not wear sunscreen to please do so! Do it for your skin! :) 

Until next time beauties. xoxo

10.20.2013

Flawless Face How-To

My absolutely HILARIOUS friend, Keesa, has been asking me for months how to teach her to do makeup, specifically eyes, and flawless skin. I love giving makeup lessons and I have been dying to get my hands on her! I love helping people to feel their best in anyway that I can, so I made sure that we made this happen. And as you can tell from the before and after pictures, we were definitely able to capture the flawless skin with her! She is seriously the most energetic and hilarious person ever!  This hot momma has two adorable girls, and just had the sweetest little boy four weeks ago! Can you believe that?! She looks amazing! 

Anyway to begin the flawless face we started with Garnier BB Cream in Light/Medium. She said that her skin has been changing due to all of the hormone changes, so I chose the BB cream because it doesn't feel too oily, gives great SPF coverage, and gives just a hint of color and coverage which I love, all the while moisturizing. 

Next I lightly applied MAC Matchmaster Foundation in 1.5 all over the face, nose and forehead, and then lightly brushed with Rimmell Sheer Powder all over her face, just to set the foundation. I love this foundation, especially for someone like Keesa who doesn't normally wear a lot of foundation -- or makeup period. This foundation gives medium coverage. Your natural skin will still show through, which was perfect for her.

I used NYC Bronzer in Fire Island Tan to contour her face. I love the light shimmer that this bronzer gives while giving you a perfect glow.

 I then used MAC Powder Blush in Pink Swoon on the apples of her cheeks to give her that healthy glow. Blush really is one of my favorite products. It adds so much vibrance and youth to a face.


After these few steps it really is that simple to get this flawless skin!


Isn't she gorgeous?! I hope she was able to get out and go on a hot date with that hubby of hers to show off her new makeup and hair!


Let me know, what do you guys think of this flawless face? Stay tuned and I'll give the how to for her gorgeous eyes!

Thanks for reading! xoxo

10.16.2013

How To Trim Your Eyebrows (The Easy Way)

Bushy and thick eyebrows are super on trend right now, but if you are like me, you need to trim them occasionally to keep them under control! 

I love Lily Collins, and I actually LOVE her eyebrows. 

Let me add that I love them on her. I, personally, really cannot pull them off. So if you aren't as daring as Lily and need to trim yours up, here are the two easy-peasy steps to trimming your eyebrows!


First: Brush your eyebrows up and out using a spiral brow brush to outline the shape.

Next: Trim with little scissors the overgrown hair that will be visible outside of the natural shape of your brow. 

Voila! Trimmed eyebrows! 


10.15.2013

5 Easy Steps To Grow Long Beautiful Hair

As a little girl I had very thick, beautiful, long blonde hair, but as soon as I hit my teenage years, and had it "thinned" out by a professional, it all went down hill from there. Not because of the professional but because of ME! I was constantly over heating, over styling, and over bleaching it. Pretty much over-doing everything to it! It has only been within the last few years or so that I have actually been happy with the health and look of my hair. I learned the hard way, so let me help you avoid doing all of wrong things for your hair! Here are five simple every day tips you can do for your hair to help strengthen and grow it out!


1-Stop using heat. This might sound silly and obvious, but honestly, if at all possible, cut down on the heat when and where you can. Try to let your hair air dry. Go for some curly waves instead of using the flat iron a couple days of the week. Put your hair up in a cute semi wet bun. I do this all the time, and will sometimes even leave my deep conditioner in, while its up in the bun, as I run around doing errands.

Now, you may be saying to yourself, "I HAVE to blow dry my hair or else it just doesn't lay right and or cooperate." I totally get that! I would suggest to let your hair air dry while you do your makeup, get dressed, etc. That way you will end up with less blow drying time, and when you do blow dry, dry it on a cool setting. Turn your flat iron and curling iron temperatures down as much as possible.

2- Use deep conditioner. I cannot stress it enough. Condition, condition, condition! Get a good leave in conditioner, and let it do the magic! Go ahead and give yourself a scalp massage while you condition. This will help with your scalps circulation, which is important in getting your hair to grow. Plus it feels amazing, so it's a win win, right?! 

3- I love using Organix Argan Moroccan Oil. This helps your hair shine, and feel super soft. If you feel like you have the texture of straw for hair, add a little bit of this and you will be amazed. You can get this anywhere. I got it at Target for something like 8 bucks. So worth it. Just be careful if you are adding it to your dry hair. A little will go a long way. Add too much, and your hair is going to look greasy. Remember you can always add more if you need! Start small.


4- TRIM! Before you can really start growing out your healthy hair, you have to get your split ends trimmed. If you don't your hair is going to just break off at the ends, and will feel like it never grows! Trust me I have been there! I would suggest getting it trimmed every three months or so, but if you notice it breaking off sooner than that, then go for it. I know that it might seem counter productive, but I promise you, it's not!

5- Eat RIGHT and drink lots of water! This is really important. I notice that when I start eating crappy, my hair and skin look crappy. If you are eating all of the right foods, fruits, veggies, lean meats and grains your hair and skin are going to glow!  I would suggest adding a multi vitamin, or you can also try Biotin, which is specifically for the growth of hair and nails. 

There you have it! Five easy every day tips to grow out healthy, long hair! Let me know how these tips work for you!